Showing posts with label mixed media layout. Show all posts

Tuesday, 1 February 2022

My blogging has been so neglected as has my scrapbooking, i am blaming it on the pandemic!!! for the lack of connection to the kids, not seeing them for all that time therefore not taking all those photos!!!
i think this may be the last layout i made in 2021 and this photo is during the summer when i had the kids over during the half term.
I'm determined 2022 will be different, 
I'm planning some picnics in the park , something easy that doesn't take too much planning!!
and they can drop in and out easily.
just need to get through these dark couple of months, I hate January and February and spend most of my time wishing for spring that takes so long to come, I see the signs , get excited but then it all stops, goes on hold for another month, then another one!!
it will come, it always does!!

this year we have moved our retreat from October to February, something to look forward to, 18 days and counting!! its over 2 years since the last one and I cant wait!

in the middle of  the first 2020 lock downs when we were thinking it will all be over by the end of summer to now February 1st  2022 and we are still predicting the end of it and in all that time we had managed to keep it out of our house, but it had to get us in the end and it did!! 
but today is release day, we have both been poorly, not too poorly thank fully, thanks to the vaccines I'm sure but its back to work today and then count down to retreat and then looking forward to spring 2022

bring it on!!


Wednesday, 17 March 2021

Scrapbook Layout-Free Spirit

Free Spirit, Scrapbook layout.


 I do love flowers!

This page is of my granddaughter Mia at my son's wedding a couple of years ago, I have titled it Free Spirit because she is just that!

 For this page I just loved the main background sheet so didn't feel the need to add to it which I quite often do its beautiful.

So, I could get straight into my layout without waiting for back ground dry which I normally have to do when I have been playing and adding texture.


Lots of layering on this page, firstly I cut strips of 3 of my papers not too important on the width but ranging from 2" wide down to 1" wide and 10" long down to maybe 8" long so that they can layer at different levels.

Two of the strips I cut points in the bottom like you would on the end of a ribbon to stop it fraying. i distressed all the edges of my strips , you can use a craft knife, dedicated distress tool, or an open pair of scissors (being very careful)

From the playing card sheet, I cut out 3 of the journaling squares and distressed the edges of these too.

I mounted my photo which is 4"x6" onto one of the papers, this can depend on your photo as to which one you use.
I then played around and decided on where I wanted them all to go, using the photo to move things around and work out the spacing. at this point I take a photo so I can look at it as I stick them all down as it is so easy to forget where I wanted it all to go! you could even put light pencil markings if it helps when placing.

I then added my photo using 3d foam pads at the bottom but not at the top to level things out as the top was slightly higher off the page.
I didn't glue or put my 3d foam pads too close to the edge of the photo as i wanted to be able to tuck things under the edge of the photo.


I then did some fussy cutting from one of the sheets and cut some die cut leaves and flourishes, I decided where I wanted them all to go and layered them up using a mixture of 3d foam pads and gel medium as my glue, tucking leaves and flourishes behind the layers of my strips and journal squares.

My title was one of the cut apart pieces from the playing card sheet that I cut with a round punch and distressed the edges.
I then added my flowers and my title. 

Lastly, I covered my photo and splattered with the oxide ink pad watered down a little to allow me to pick it up with a paint brush.


products used.....
Paisley and vine papers.
             whimsy- background sheet- strip
             splendour- fussy cutting- strip
             nature- strip
             playing cards- journaling squares- title

49 and market flowers- scarlet
distress oxide- festive berries- for splatters

round punch 
leaves and flourishes dies 

Monday, 1 March 2021

Scrapbook Page Layout.

My First design for Janine at The mad Scrapper

Happy to be playing again and these papers are just lovely and bright, although hard to find something to match up to this set of photos, nothing is as bright as these photos!!

Using the Blue Fern Studios ,Paisley and Vine modern collection.


Sometimes I can just pick up a base sheet and go with it and other times I have to add, this is one of those times, I felt I just needed to add to it and as the photo is of making a mess, I needed a bit more of a messy back ground so I started by adding some stencilling through a circle stencil and using a green ink and a sponge.


I went over again using 2 stamps that help to create backgrounds, sort of splatter designs, you could do just the same by actually splattering, i used a

I loved the diamond sheet from the collection and used them as diamonds, I cut a strip off as a base cutting the diamond shape and also cut a few of the actual diamonds separately. I inked the edges of the diamonds just to help them pop off the page as the colours are very closely matched.

I cut some more strips from the different papers from the collection and added a little stamping for interest, used a punch for the heart circle and to make the arrows all from the papers in the collection , I made a little camera embellishment with a stamp onto a scrap of one of the papers, again I inked the edges to help them pop and make them a little grungier as it's not a clean page and it definitely wasn't a clean day when taking these photos. 


putting it all together, I layer all my elements on the page moving around until I am happy with the design, I find this is the time to take a photo to look back on as I fix everything in place because I am very likely to forget where it all goes.

I started with the strips at the bottom and then added my photo which I added using 3d foam pads so that it lifts it off the page a little and allows me to tuck bits behind so remember not to go right to the edge with the sticky pads or you won't be able to tuck things behind.
Next it was the separate diamonds tucking under here and there, the arrows, I double mounted the 2 on the left, the photo and heart on the right and the title on the left with the diamond tucked underneath.

I ended up by covering my photo and splattering with the same ink that I used to edge my pieces, I watered it down a little on my glass mat so allow me to splatter with it.

Items used....

Paisley and Vine papers - Whimsy, Pathway, Splendor and playing cards.
Distress Oxide, Faded Jeans.
Distress oxide, Mowed Lawn.

Camera stamp
splat stamps
arrow stamp
circle stencil
arrow punch
circle punch

Saturday, 13 February 2021

Scrapbook Layout - Explore

Scrapbook Layout - Explore
One of my favourite photo's of Loki, I think the non posed photo's more often than not make the best photo's he was just being himself doing what he does.


The photo and the papers complement each other, the fussy cutting picking out the greys and greens from his hoody and the stencilling, and the papers picking out the the browns from the wood.

The page is made up in 3 layers, firstly the stencilled leaves, using a Finnabair Impasto paint sponged through the stencil onto the base sheet, taking into consideration the placing of the photo and embellishments so that the stencilling can be seen poking out the sides.

Then second layer is the layering of the back papers, different widths and lengths going vertically and horizontally, I distressed the edges of these strips to add more texture to the page.
The die cut leaves are are in this layer too, layered up with the strips again taking into consideration the placing of the photo so that the leaves can be seen.

I take several photo's as I go along of the positioning of things so that when I place them all and am happy I then take them apart and glue them in place but can forget where they were so a photo is great to look at for the gluing part.

The last layer is the photo and the fussy cutting plus the title, the photo is mounted and then I use 3D foam pads so that it adds some height and allows me to be able to tuck things underneath, again I have placed all my pieces on and when I am happy I take a photo to look back on. 
I have placed  a flower under the E of the title using  3D foam pad  to raise it up level with the photo to keep the title level.
Some of the flowers are tucked under the photo and some are overlapping onto the photo and overlapping each other.
Lastly I have added my flower to finish.

Kit available with full instructions and supplies to make this page ... Scrapsnscribblesuk Page Kit


Thursday, 4 February 2021

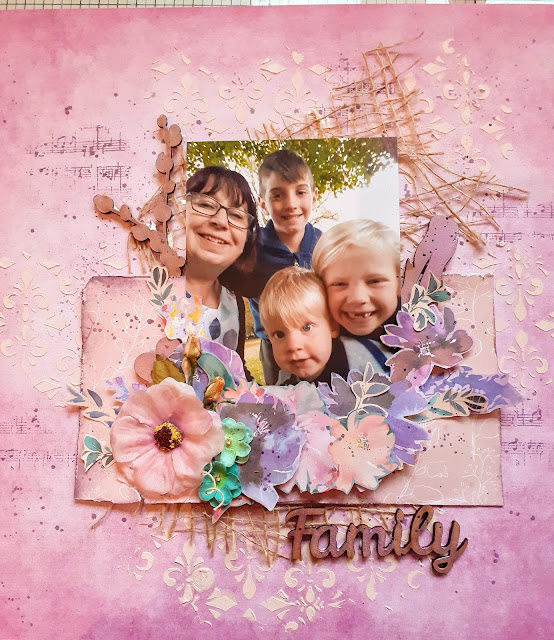
Scrapbook Layout- Family

Scrapbook page kit
its pink!! not a colour i would normally use to this extent, its not that i dont like pink, i do but not normally this much.
love this though
and have made it into a kit available from my etsy shop.


fussy cutting one of the things i love to do,
 plus added tactile elements, not just the paper,
 its got MDF, hessian, silk and paper flowers too.
plus it has stencilling on the base 12x12 paper for even more added texture.


Wednesday, 18 November 2020

Journal - Holly Jolly Christmas

 Christmas journal double layout using Holly Jolly Christmas by AB studio, a DT project for Thompsons craft supplies.


.for this project i used......

thompsons craft supplies flower collections

lots of fussy cutting, the tags, wreath and lots of other bits.

from my stash i used some ribbon some red acrylic paint,3d foam pads, 3d gel medium, clear gesso.

i cut my background papers to size and distressed the edges with open scissors (whoops be careful)
 i stencilled some red paint on through the stencil we used for the recent retreat.

i cut out 2 tags from one of the sheets and punched the holes out and added my ribbon.
then it was simply fussy cutting and layering, the different elements.
layering using my 3d foam pads and 3d gel medium to gain the height.
i added some paper flowers and lastly i splattered with watered down red paint.
got to love the splattering.


Wednesday, 14 October 2020

Mixed Media Butterfly

 Mixed Media Butterfly.


Its great to work on different shapes for scrapbooking, i love to mix it up a bit.

another Dt project for Thompsons craft supplies.

for this project i used.....

woodouts butterfly mdf blank

13arts papers end of summer

hobbilicious mdf feathers and leaves

hobbilicious hobbles

finnabair art alchemy wax firebird

finnabair art alchemy sparks acrylic paint phoenix feather

from my stash i used black gesso, 3d medium.

to start with i covered my butterfly with one of the papers and using some sand paper i distressed the edges.

next i gently edged it with some black ink

i mounted my photo onto black card

then i painted my mdf feathers and leaves with black gesso

i fussy cut some of the designs from the paper pack .

then i layered them all on without gluing to decide on my design, i took a photo to remind me of where i wanted everything and then removed it all.

i gradually started to build it all up using 3d gel medium as my glue for my mdf pieces and 3d foam pads with the medium to stick down my paper pieces, the 4d foam pads also adds height to the pieces so you have a lovely 3d finish.

i then mixed together some 3d gel with the hobbles and added round the butterfly edge and across the leaves and feather.

when it was all dry i added some wax to my hobbles edging and the black gesso'd feather and leaves, not completely covering, still allowing the black to dominate.

lastly i splattered with somewatered down black gesso and some watered down sparks paint.


Follow your Heart - Scrapbook Layout

Follow your heart scrapbook layout
these papers are just my subject and colourways, just love them, and when you love something it makes it very easy to create with them, and this set did just that.

My DT kit from Thompsons craft supplies for October 
i need to get these done before i go away on my weeks sewing retreat with friends 
(if restrictions allow, watching the updates constantly!!)
and this range is making it very easy to do that.


for this project i used......
13arts end of summer A4 sticket sheet
13arts end of summer stencil - sunflowers
 finnabair sparks acrylic paint - pheonix feather
finnabair art alchomy wax -  firebird
Tim Holtz idea ology words
Hobbilicious mdf leaves
Thompsons craft supplies flower collections

from my stash i also used clear gesso

my how to....
i started by painting my whole background sheet with clear gesso, 

when this was dry i sponged through my stencil with the acrylic paint.
i mounted my photo on some white card stock and placed in just above centre using 3d foam pads and 3d gel
i chose and fussy cut my paper elements and painted with clear gesso,
i then placed them all to see how my arrangement would sit, when i was happy i took a picture to refer back to , took it all apart and started to glue it all in place using 3d foam pads and 3d gel for the paper elements and the 3d gel for the mdf leaves.
starting with the mdf leaves i built it up finishing with the paper flowers.
i then added my title.
i covered my photo and splattered with water down acrylic paint.


Monday, 5 October 2020

Mixed Media Retreat--At Home

 so this weekend just gone we were meant to be 30 strong on a mixed media retreat, self catering, craft workshops , gifts and games, a weekend of crafting and fun.....
No
the decision was made a little while ago that it could not go ahead in the current situation understandable, but still disappointing 

so what to do.....
go online of course, so with a lot of work, mostly from Louise at Thomson Craft supplies we had an online workshop with fab projects and crafty fun all from the safety of our homes.

and it was amazing, had a lot of fun and a great crafty fix.


Wednesday, 2 September 2020

Till We Meet Again -Journal Layout

Last of my Designs from my August Dt kit From Thompsons craft supplies
the gorgeous Till we meet again papers.

Travel the world over to find the beautiful,
Till we meet again.


quite a clean and simple page for me, i just love the papers and didn't want to lose them in all the grunge and product.

for this project i used.....
p13 Till we meet again papers
pentart cracking paste and primer
Tim Holtz ideaology chipboard quotes
Finnabair micro beads

just love gates and doors so i didnt want to cover them, 
i cut my papers to fit the pages in my journal, on the left just edged with the primer and paste and then added my first part of the title.

on the right i again edged with the primer and cracking paste, 
i added my distressed door , edged with the micro beads
added the fussy cut elements, layered them up and added the second part of my title.