Friday 28 June 2019

Bloom and Grow- Mixed Media Canvas

Ok so not what i intended at all!!
it was meant to be light and spring like lol but it ended up more strong and late summer like.
but i love it all the same.
AALL & create stamp, flowers and hessian background from Thompsons craft supplies
Tim Holtz distress ink 


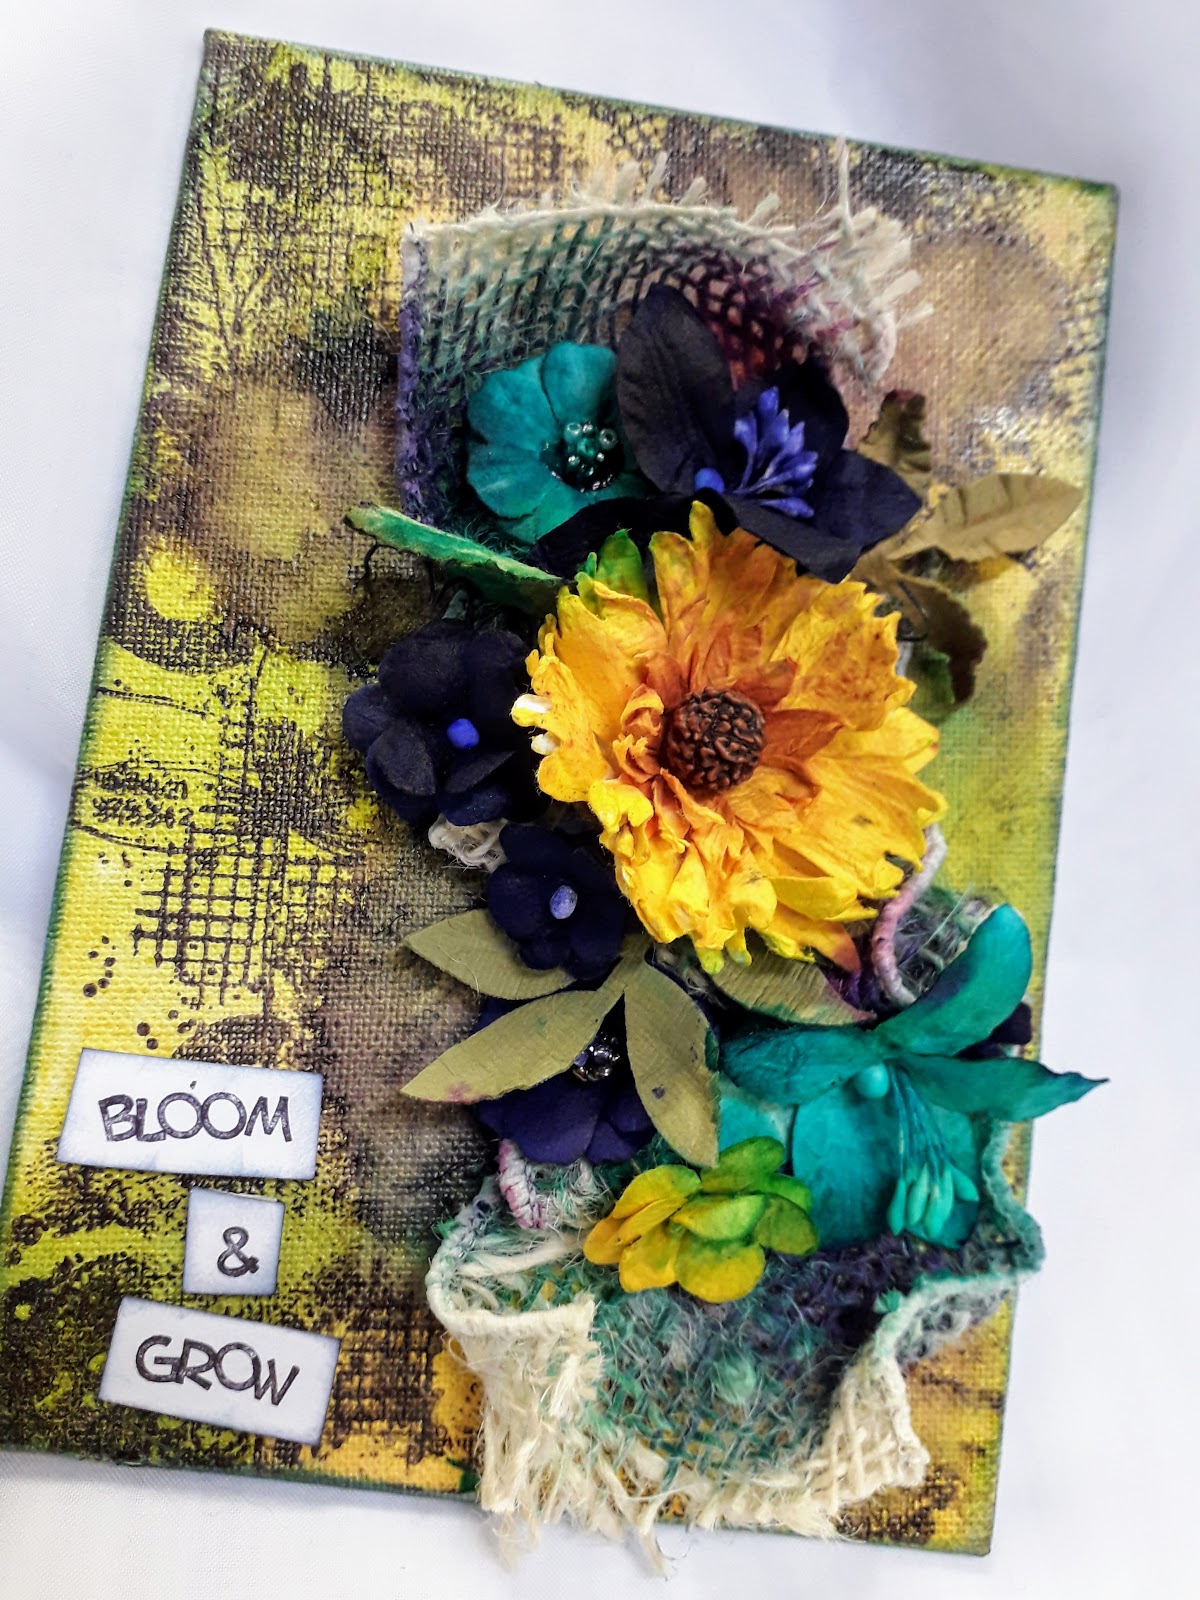
using AALL & CREATE stamp and distress ink for my background

the hessian is from Louise's lace and fibre grab bags , it has a wired edge so i could shape it and then stick down with 3d gel.

the flowers were white and blue but as i say things took a different turn from that in my head when the background took on this form lol and the blue and white didn't fit so they got a ink spray and turned into purple and yellow


i just love the vibrant colour it all ended up, i put some ink underneath my flowers too and with a little spray of water i got them moving round and seeping into my hessian, its just fascinating when it does its own thing.

i hand stamped my title which is the name of the stamp i used on the background.


Thursday 27 June 2019

Trust Your Heart-Mixed Media

I haven't played with heat embossed in quite some time, so i had great fun doing this.
why haven't i played with heat embossing? i have no idea, its fab and really adds to a project, must remember it in future!!

i created my back ground with distress inks in a yellow,orange,red and purple
i used a sponge and a circular motion from the edges in to the middle, 
building the colour up as i went.

i then stamped and embossed my image straight onto the background and embossed using a purple embossing powder, its amazing watching the powder change.

i coloured in some of the detail from the stamp using the red distress ink and water and a very small paintbrush.

next i splattered all over with just plain water, it gives this fab water droplet affect .


i stencilled in the right hand side sunbeam detail with the stencil and the yellow distress ink, its subtle but adds to the overall affect.

i cut out my circle and coloured and splattered in the same way and mounted in using 3d foam pads

i chose and added my title and mounted also with the 3d foam pads so it has some height to it in the center detail.

i finished by mounting it onto a white cardstock to form the border.


 these are the stamp and stencil used in this project.


Monday 24 June 2019

Beautiful-Scrapbook Layout

Playing with the AB Studio- Somewhere over the rainbow paper collection from 
and one of the AB Studio mdf shapes.

a little bit out of my comfort zone with bright papers, i am normally a bit more muted, grungy than this but i am trying, i keep dabbling on the bright side lol

i firstly took the mdf and filled in some of the design, the flowers with some of the patterned papers and left gaps for the background paper to show through.


i then found a set of rose and leaf stamps and stamped onto some of the patterned papers, fussy cut them out and coated them with glossy accents.
while they were drying i fussy cut some of the elements from the paper pack, the hearts and butterflies.
i added some of the fibres from Louises lace pack.

i mounted my photo onto some of the patterned papers and then layered everything up and adding my title, moved it all around until i was happy, took a photo so i could see where it all went and removed it all so i could start sticking it all down using my 3d foam pads and 3d gel, referring back to my photo cause i can never remember where i had it all.

then lastly as in most cases i covered my photo and splattered with some watered down white paint, i always say it but this splattering really does finish it off and bring everything together.


Friday 21 June 2019

Make Time Mixed Media Canvas

So i was having a mental block earlier in the week, i was a bit mah!! 
my mojo had left , leaving my head empty!!

so Louise from Thompson craft Supplies sent me a prompt.....
it should include the colours brown and blue....should have floral....should have a time piece, clock/clock hands......and the phrase endless, endless time, endless love were her prompts....ok so i changed the endless to time!
but i think i am pretty close.

i would not normally put brown and blue together but i am pretty pleased with the result.


so what did i do........i covered a canvas with the music paper and distressed the edged, and added a bit of stamping to help age it a bit more, i then used a doily stencil from Louise, think it was in this latest kit, and some impasto blue paint through it, then then dot stencil with paste.


when it was dry i added my numbers and clock arms, placed my flowers and die cut leaves plus butterfly, when i was happy i stuck them all down using a 3d gel paste oh i have a big ribbon bow sitting underneath the flowers, you can just see it poking out from under the flowers at the top and bottom, it is just a hand tied bow made really long to fit the length of the canvas.


when that was all dry i added some ink, i just dropped a bit here and there tucking under the flowers and along the edges and corners and then sprayed a bit of water and moved the ink round a bit, i then added some gold paint using it as a wax and rubbing it on with my finger, round the edges and onto my elements, just gently here and there.

i hand stamped my title onto white card, cut them out , put a journal pen border round then sponged a bit of  brown stazon ink round the edges to get rid of the bright white of the card. 

and to finish i splattered with the gold paint i had used earlier, it was a metallic so it is giving a lovely little sparkle in the light.

you can see in the last pictures that when i dropped my blue ink on and sprayed with the water that some has gone onto the flowers, i love they way these things happen.


Thursday 20 June 2019

Enjoy the Journey-Mini Mixed Media Canvas


This one really is a canvas, one of the really mini ones that comes with the stand from the Works, a lovely size, to be fair i don't mind what size they are i love making canvases!!

using the mdf balloon (i love this balloon) clouds and flowers from pretty gets gritty.


i just covered the canvas with a mixture of heavy body paste and glass glitter and scraped it all over the canvas, gave it a quick blast with the heat gun and arranged my mdf onto it , stuck down and then added a bit more of the paste mixture and gesso'd over all of the mdf pieces.


when it was all lovely and dry i had fun with the colours, spraying in on and then adding water and moving the colour around, drying in between colours so i didn't end up with a brown mess lol

don't be put off with the colouring, it can take a few layers before you are happy with the colours, don't panic and think you have ruined it just dry it and add some more until you are happy.


once dry i then gently brushed over with my finger adding some silver wax, just picking up the texture of the paste and glass glitter.

lastly i added my title.


Wednesday 19 June 2019

Create Art- mixed media canvas

Well actually its not a canvas its a coaster, i have found these are fab for a great solid background for a mixed media project and a fab size too.....oh and a fab price, pack of 4 for a £ from the you know where shop lol

i just love doing back grounds and texture, can you tell?


firstly i have stenciled the background using a heavy paste, dried it with a heat gun and then gesso'd it all over and left to dry.
while that was drying i made some wings using paper clay 
and chose some other mdf shapes to play with. oh and my title

i then layered my bits and pieces on, moved them around and then back again until i was happy with my layout, dont forget to leave a space for your title.
I then took it all to bits again lol, this is where i usually take a photo else i will just forget where i wanted it al, i can refer back to my photo.


then i stuck it all down using a 3d gel, i mixed up some paste with some glass glitter for my texture and added that all over my canvas, 
when i was happy with it all i left it to dry thoroughly as i was going to be adding ink and water so if its not dry you can get into problems with things moving and washing off!


 the colour is a great part of it, drop or spray some ink on ,spray it will water and move the ink around, tilting your project until you are happy, dry your project between layers of ink or you will just get a brown mess lol.....been there done that!!
keep adding layers of colour until you are happy, drying as you go, 

when it was completely dry i added some silver wax, just picking up the texture, so gently brushing my finger over the raised areas and on the edges of things, it really does finish things off amazingly.
don't forget to add tour title.


Monday 17 June 2019

Limited Edition - Scrapbook Layout

Limited Edition - scrapbook layout

I had a bit of a scrappy block over last week, stressful home time........ so needed something to get me going, so a simple , bit of stamping and distressing paper type of page.
but very happy with the result.

using Botany Summer by fabrika Decoru from thompsons craft supplies


Firstly i clear gesso'd my whole background sheet and then coloured through a leaf stencil with brown paint.
i then cut some strips of the patterned paper and distressed them, fussy cut some flowers and the cards up the side.


i decided on my title and mmmed and ahhhed about the placement and finally decided, sdded a couple of butterfly's 


i ended with some splattering of course.

a very simple page but enough to get the mojo going