Showing posts with label mixed media. Show all posts

Wednesday, 19 May 2021

Nature Trail- Scrapbook Layout.

 Another design for The Mad Scrapper 

I had no idea for this before I sat down to work on it, i am very happy with the result.

Nature Trail


For this page I used just paper 3 ... 12x12 sheets and a plain white cardstock,
 I love it when some papers have just everything you need to complete your page, i sometimes find I am spending far too much time trying to find other bits and pieces to fit!

I started with the hello happy for my base and cut round the right-hand side of the middle 3 butterflies only, lifted them up from the page and then backed with an off cut from one of the other pages.


My photos started off 6x4,  I trimmed them down to allow me to fit the 3 photos on my page and then mounted them on white cardstock just to allow the photos to lift off the page and not sink into the back ground. I put them aside to work on my back ground.


I cut three pieces from the other papers, remember these are double sided papers so great for using more of the design, I didn't measure the pieces just went with the size of my photos and placed them down and trimmed until I was happy with the sizing, I then distressed the edges with open scissors, please be careful doing it this way, there are distressing tools available to buy for this.

I then fussy cat the large flower, looks a bit hydrangea like to me, one of my favourite flowers!


I placed my backing pieces and photos down and moved around with my flower until I was happy with the layout and then stuck them down, you can do this by picking up corners and sticking down or by taking a photo to look back on to take up and layer your pieces on, I tucked my photos under and on top of the flower, I love to have things overlapping!


Next was making my title I look one of the papers and hand wrote my title using a journaling pen, cut round it roughly and then roughly coloured with a gold paint pen. I gently inked the edges and mounted on 3d foam pads to lift it off the page slightly.

Next, I fussy cut 3 more butterflies from one of the other papers, inked then gently, shapes them and placed around my title.


Lastly, I went round my main backing and my layered pieces with my journaling pen, just roughly bordering them, it adds a frame to my work and gives it a great finish I feel, jut roughly no ruler just a slightly wobbly line, in fact I think I went round 2 or 3 times, i love to finish things off this way, it's a great detail so simple but adds a lot to a page. 

Tuesday, 30 March 2021

Mini Album/Journal.

 Handmade journal/ mini album

next DT project for The Mad Scrapper

oh I love a mini album.


I love it when I get some packaging like this, it's the perfect size and already in the perfect shape for a mini album, one of my favourite things, I love them for an event when you have quite a few photos to document, there is an end to it so it becomes complete.


For the outside and inside I cut the pieces for the flat surface and attached them with a strong double sided tape and then cut the spine pieces, measured and scored where I needed the folds to be but made sure they were wider so they overlapped the main pieces, on the front panel I added the extra red coloured strip just to add a bit of interest, again fixing the spine covers in place with a strong tape, right up to the edges so there will be no lifting.

I distressed all-round the edges of the book with a sand paper block, it just softened the edges a bit.


I added my elastic for my inner pages by punching holes and threading the elastic through and back again, tying a knit at the bottom.
The pages are just 12x12 cardstock cut to size and folded in half, they then tuck under the elastic, you can add more pages as and when you need or add different sizes for more interest, the pages can be removed to work on for ease and then added back in when finished.

For the outside design I cut some of the pieces from the playing cards sheet and layered them up with my metal leaf, die cut flower, embellishment cluster and my title. I used 3d foam pads and gel mediums for my glues adding height to the design.
Lastly, I splattered using the oxide ink watered down and using a paint brush to splatter.

On the inside I cut a pocket and with a strong double-sided tape I fixed in place, i then did some fussy cutting from the splendor sheet and glued it in place just poking out of the pocket, i made myself some little tags and cut some elements from the playing cards sheet and tucked them in the pocket, you could add another pocket on the inside back cover the add more bits and pieces from the set so they are to hand when adding to your mini book, embellishments ready to go.


products used.....

Paisley and vine papers

from my stash I also used ....
Bramble Fox Perspectives
Embellishment cluster
Metal leaf 
Flower die cut piece

Wednesday, 17 March 2021

Scrapbook Layout-Free Spirit

Free Spirit, Scrapbook layout.


 I do love flowers!

This page is of my granddaughter Mia at my son's wedding a couple of years ago, I have titled it Free Spirit because she is just that!

 For this page I just loved the main background sheet so didn't feel the need to add to it which I quite often do its beautiful.

So, I could get straight into my layout without waiting for back ground dry which I normally have to do when I have been playing and adding texture.


Lots of layering on this page, firstly I cut strips of 3 of my papers not too important on the width but ranging from 2" wide down to 1" wide and 10" long down to maybe 8" long so that they can layer at different levels.

Two of the strips I cut points in the bottom like you would on the end of a ribbon to stop it fraying. i distressed all the edges of my strips , you can use a craft knife, dedicated distress tool, or an open pair of scissors (being very careful)

From the playing card sheet, I cut out 3 of the journaling squares and distressed the edges of these too.

I mounted my photo which is 4"x6" onto one of the papers, this can depend on your photo as to which one you use.
I then played around and decided on where I wanted them all to go, using the photo to move things around and work out the spacing. at this point I take a photo so I can look at it as I stick them all down as it is so easy to forget where I wanted it all to go! you could even put light pencil markings if it helps when placing.

I then added my photo using 3d foam pads at the bottom but not at the top to level things out as the top was slightly higher off the page.
I didn't glue or put my 3d foam pads too close to the edge of the photo as i wanted to be able to tuck things under the edge of the photo.


I then did some fussy cutting from one of the sheets and cut some die cut leaves and flourishes, I decided where I wanted them all to go and layered them up using a mixture of 3d foam pads and gel medium as my glue, tucking leaves and flourishes behind the layers of my strips and journal squares.

My title was one of the cut apart pieces from the playing card sheet that I cut with a round punch and distressed the edges.
I then added my flowers and my title. 

Lastly, I covered my photo and splattered with the oxide ink pad watered down a little to allow me to pick it up with a paint brush.


products used.....
Paisley and vine papers.
             whimsy- background sheet- strip
             splendour- fussy cutting- strip
             nature- strip
             playing cards- journaling squares- title

49 and market flowers- scarlet
distress oxide- festive berries- for splatters

round punch 
leaves and flourishes dies 

Saturday, 13 February 2021

Scrapbook Layout - Explore

Scrapbook Layout - Explore
One of my favourite photo's of Loki, I think the non posed photo's more often than not make the best photo's he was just being himself doing what he does.


The photo and the papers complement each other, the fussy cutting picking out the greys and greens from his hoody and the stencilling, and the papers picking out the the browns from the wood.

The page is made up in 3 layers, firstly the stencilled leaves, using a Finnabair Impasto paint sponged through the stencil onto the base sheet, taking into consideration the placing of the photo and embellishments so that the stencilling can be seen poking out the sides.

Then second layer is the layering of the back papers, different widths and lengths going vertically and horizontally, I distressed the edges of these strips to add more texture to the page.
The die cut leaves are are in this layer too, layered up with the strips again taking into consideration the placing of the photo so that the leaves can be seen.

I take several photo's as I go along of the positioning of things so that when I place them all and am happy I then take them apart and glue them in place but can forget where they were so a photo is great to look at for the gluing part.

The last layer is the photo and the fussy cutting plus the title, the photo is mounted and then I use 3D foam pads so that it adds some height and allows me to be able to tuck things underneath, again I have placed all my pieces on and when I am happy I take a photo to look back on. 
I have placed  a flower under the E of the title using  3D foam pad  to raise it up level with the photo to keep the title level.
Some of the flowers are tucked under the photo and some are overlapping onto the photo and overlapping each other.
Lastly I have added my flower to finish.

Kit available with full instructions and supplies to make this page ... Scrapsnscribblesuk Page Kit


Thursday, 4 February 2021

Scrapbook Layout- Family

Scrapbook page kit
its pink!! not a colour i would normally use to this extent, its not that i dont like pink, i do but not normally this much.
love this though
and have made it into a kit available from my etsy shop.


fussy cutting one of the things i love to do,
 plus added tactile elements, not just the paper,
 its got MDF, hessian, silk and paper flowers too.
plus it has stencilling on the base 12x12 paper for even more added texture.


Friday, 8 January 2021

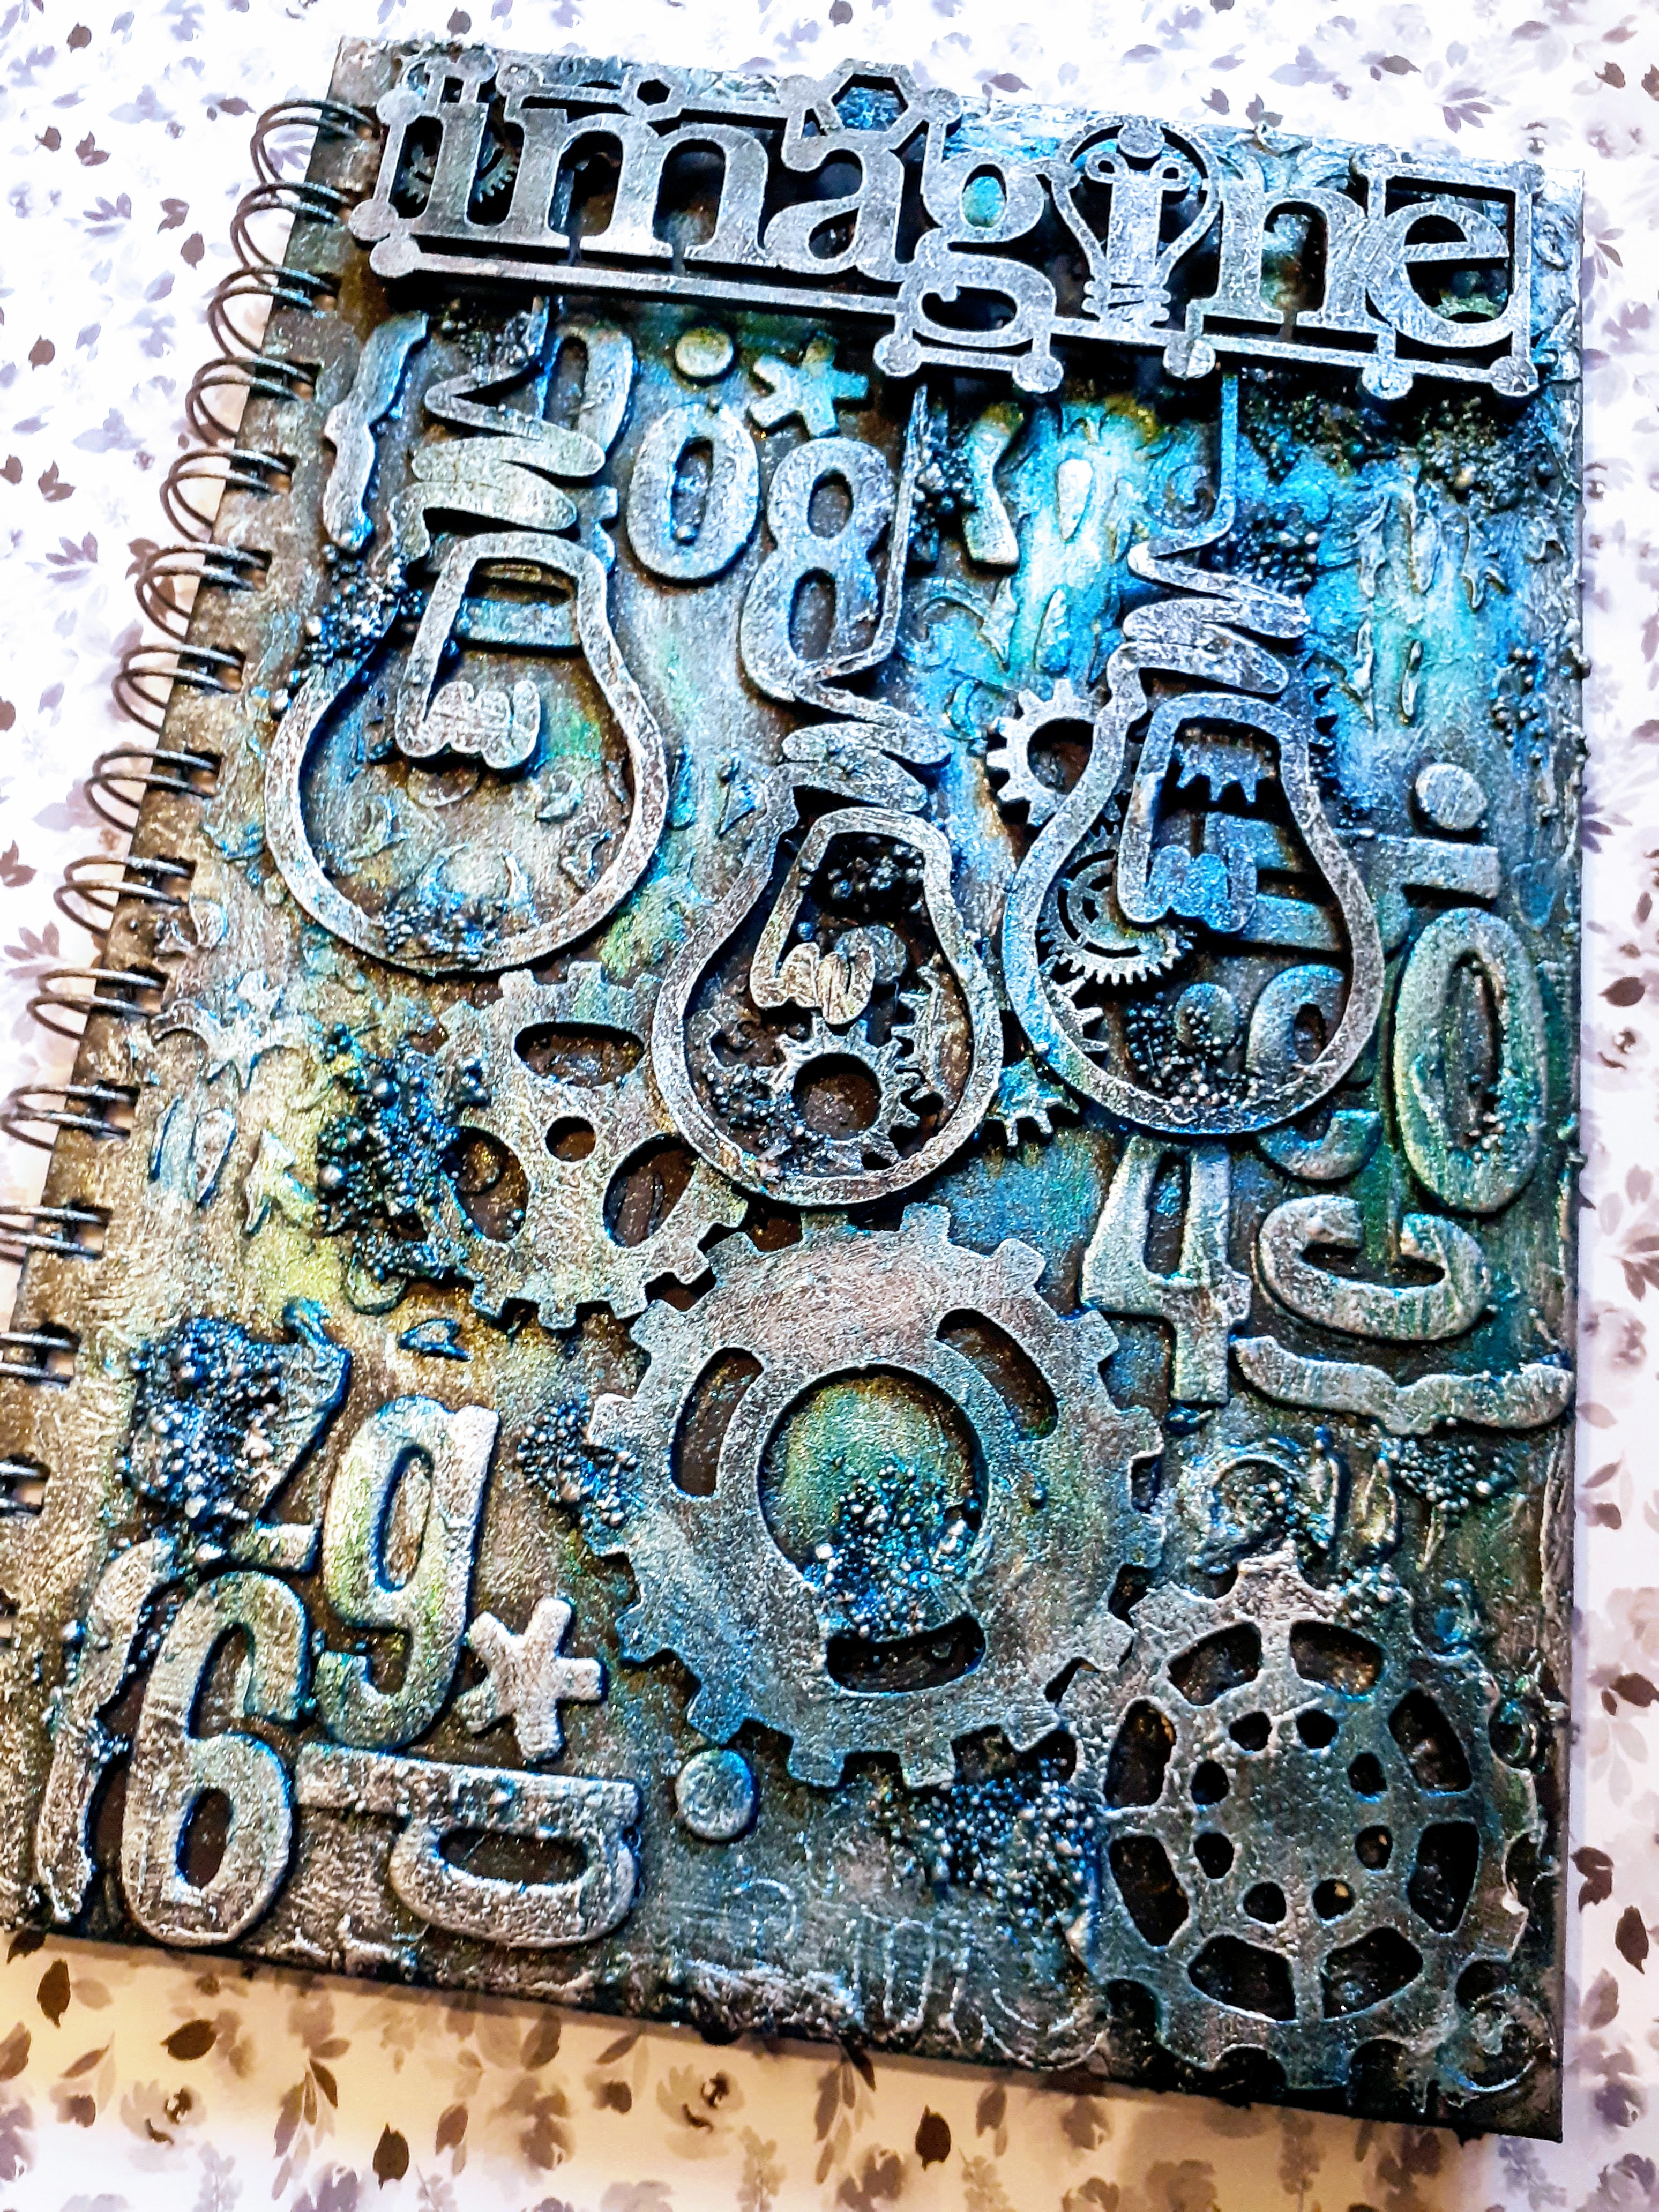
Imagine-Mixed Media Notebook

 And again..... 

a completely different colour pallet and subject to this notebook, not one i would normally do, again just went through my drawers and picked out things .

love the result.


cogs and old leftover alpha letters are a great base for any project and just loving these mdf light bulbs, always reminds of  every time i said light bulb and i would get yelled at LAMP, i would always yell back ..... you don't go in wilkos and ask for a light lamp do you??  this was the life in a theatrical hire company full of technical people...... anyway i digress!!!

again, stencil and paste, the alphas and cogs go on first, i may add just a couple more later when the next layer go on as foundations to hold the next layer steady, when dry all is then painted with black gesso
 the title and light bulbs go on next adding a couple more cogs under the title to make sure it is attached well and secure, more black gesso, i do this on the different levels as it is easier to get everything covered, if you leave it to the end you will find it hard to get to the bottom layer,  some more texture is then added with gel medium and glass glitter and beads, when dry more black gesso and then when all is nice and dry in with the paint and wax, dry painted so pretty much get all the paint off of a stiff paint brush and gently brush over gradually building up the paint, three colours i used , going over with one colour then the next and the next then picking through the colours again until i am happy, you cansee that the black base is still very visible.
lastly i used a silver wax and my finger just picking up the details of the textures.
very happy with my finished project.


Blossom Notebook- Mixed Media

 when your enjoying doing something why stop, really enjoyed the way i made the last notebook, by just opening drawers and picking stuff out so i did it again......

this time a floral theme and completely different colour pallet.


using resin and moulds, stencil and heavy paste, some lace, pearl half beads , seed beads in gel medium to make more texture ,
 then white gesso all over and left to drywell,
 dry brushing with several different colours of metallic paint building the paint up until i am happy with the colours and finishing with gold wax applied with my finger to pick up the texture detail.


Sunday, 3 January 2021

Mixed Media - Dream Notebook

Now Christmas is out of the way and things can slow down a little bit plus back into 
being at home again (tier 4)
maybe i can get back to a little bit of relaxing crafting, i went into my craft room and tidied up a little bit, you know how it gets when your not crafting much and it becomes a dumping ground, well tidied up and started to just look at things, i had found a notebook at work (the Works) and it needed a spruce up so perfect for a getting back to it project.


i just started going through things, found some odd left over letters and numbers so they went on, then i started opening my mdf drawers and found the cogs so they went on,  a hexagon stencil and some paste. then i came across some resin leaves and swirls so they went on, i found some metal stars and pearls half beads, a few more cogs .


when the paste was nice and dry i then used black gesso all over and left to dry again.....
back into the mdf drawers and i found the heart and wings and the Dream title.

lastly i found the resin wings and face so they went on too, all gessod black and left over night to dry and then today i played with paint and  wax
Red, Purple and Orange paints dry brushed on going on with each colour then going back again to the colours and building it up until i am happy with the colour mix but still seeing the black base coming through, and then gold wax applied with my finger, picking up the texture.


Wednesday, 25 November 2020

Holly Jolly Christmas Tag

Holly Jolly Christmas by AB Studio, a lovely christmas paper pack, part of my latest kit from 
this time a christmas tag.


for this project i used.....


from my stash i used,  red acrylic paint, 3d foam pads, clear gesso, gel medium.

firstly i covered my tag with paper from the pack and then i coloured my paste with the red paint and stencilled it onto the back ground.

i  then did some fussy cutting and using the 3d foam pads and gel medium i layered up my design.

i then went over thw whole thing with the clear gesso, when that was all dry i added the glitter paste to the raised stencill on the back ground and the baubles and candy canes.

lastly i watered down some white gesso and some of the red paint separately and splattered all over with both.