Showing posts with label hobbilicious. Show all posts

Tuesday, 10 November 2020

The Secret Garden

 Loving the Secret Garden Kit from Kits'n'kaboodle and had great fund creating this piece from my kit, plenty left to creat more projects too.


i added lots of cherry blossom to my kit to make my project, stencilling, painting, waxing and this is the result.


Wednesday, 14 October 2020

Mixed Media Butterfly

 Mixed Media Butterfly.


Its great to work on different shapes for scrapbooking, i love to mix it up a bit.

another Dt project for Thompsons craft supplies.

for this project i used.....

woodouts butterfly mdf blank

13arts papers end of summer

hobbilicious mdf feathers and leaves

hobbilicious hobbles

finnabair art alchemy wax firebird

finnabair art alchemy sparks acrylic paint phoenix feather

from my stash i used black gesso, 3d medium.

to start with i covered my butterfly with one of the papers and using some sand paper i distressed the edges.

next i gently edged it with some black ink

i mounted my photo onto black card

then i painted my mdf feathers and leaves with black gesso

i fussy cut some of the designs from the paper pack .

then i layered them all on without gluing to decide on my design, i took a photo to remind me of where i wanted everything and then removed it all.

i gradually started to build it all up using 3d gel medium as my glue for my mdf pieces and 3d foam pads with the medium to stick down my paper pieces, the 4d foam pads also adds height to the pieces so you have a lovely 3d finish.

i then mixed together some 3d gel with the hobbles and added round the butterfly edge and across the leaves and feather.

when it was all dry i added some wax to my hobbles edging and the black gesso'd feather and leaves, not completely covering, still allowing the black to dominate.

lastly i splattered with somewatered down black gesso and some watered down sparks paint.


Follow your Heart - Scrapbook Layout

Follow your heart scrapbook layout
these papers are just my subject and colourways, just love them, and when you love something it makes it very easy to create with them, and this set did just that.

My DT kit from Thompsons craft supplies for October 
i need to get these done before i go away on my weeks sewing retreat with friends 
(if restrictions allow, watching the updates constantly!!)
and this range is making it very easy to do that.


for this project i used......
13arts end of summer A4 sticket sheet
13arts end of summer stencil - sunflowers
 finnabair sparks acrylic paint - pheonix feather
finnabair art alchomy wax -  firebird
Tim Holtz idea ology words
Hobbilicious mdf leaves
Thompsons craft supplies flower collections

from my stash i also used clear gesso

my how to....
i started by painting my whole background sheet with clear gesso, 

when this was dry i sponged through my stencil with the acrylic paint.
i mounted my photo on some white card stock and placed in just above centre using 3d foam pads and 3d gel
i chose and fussy cut my paper elements and painted with clear gesso,
i then placed them all to see how my arrangement would sit, when i was happy i took a picture to refer back to , took it all apart and started to glue it all in place using 3d foam pads and 3d gel for the paper elements and the 3d gel for the mdf leaves.
starting with the mdf leaves i built it up finishing with the paper flowers.
i then added my title.
i covered my photo and splattered with water down acrylic paint.


Thursday, 8 October 2020

Mixed Media Notebook

 Oh the projects came so easy with these 13arts papers, just love them.
my second DT project for Thompsons craft supplies
a mixed media notebook, i love books and have many, the problem is i write in them all and then cant find what i am looking for because i have so many lol.


for this project i used....,
Thompsons craft supplies mixed flower collections
finnabair metallic wax firebird
craft oclock mixed media quotes 2
creative embellishments frame
mdf leaves and feathers
hobbilicious stencil elfland
color glow golden calite
finnabair art alchomy paint phoenix feather

from my stash i used black stazon ink,black gesso, white gesso, 3d gel for my glue and some glass bead texture gel, you can make this with 3d gel and just mixing with glass seed beads, the gel will dry clear.

to start with on this project as it is a bound notebook i started by stippling the spine with white gesso and round the edge of the cover, i dried it with my heat gun and then stippled the paint on, no need to do the middle as it will be covered, i did the back in the same way but had to wait till one side was completely dry before doing the second side .

i then cut papers to fit the front only not the spine and slightly smaller. i glued on using my 3d gel and then painted all over with my clear gesso and dried.

i then sponged the orange paint through my stencil randomly over the front and back .

while that was drying i painted my frame with black gesso and then that was stuck on with the 3d gel.

i added some of the bead gel around the book edges and in parts around the frame and dried them.

i then sprinkled some of the colour glow in places and sprayed with water to activate and move the colour around a little and then dried.

i painted my mdf leaves and feathers with the paint and when dry just distressed the edges with black my black ink pad.

i fussy cut a flower collection and a single sun flower and butterfly and layered up the paper pieces and mdf feathers and leaves.and added my butterfly.

i painted my paper pieces with clear gesso and dried.

i then distressed all around the book edge very gently with the black ink pad and then using my finger waxed picking up the beads and the frame detail in parts.

i added my title which i had distressed with the wax.

lastly i watered down a little black gesso on my glass cutting mat and splattered gently all over.

for the back i got as far as the stencilling and adding the colour glow then inked gently with the back round the edges and then picked up detail with the wax but left it without any other embellishments so that it will sit flat.


l. 

Monday, 5 October 2020

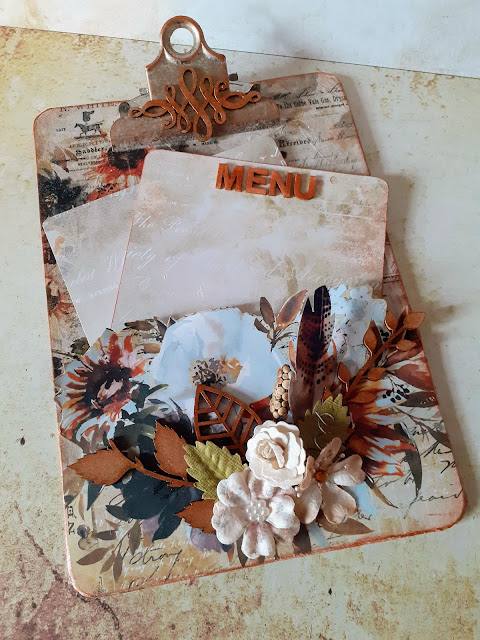
Mixed Media Clipboard

 The First of my October Dt projects for Thompsnscraftsupplies.
oh my how i love this paper set from 13arts, its right up my street, i love autumn and the colours on this set are so strong and lush, it was so easy to create with.


for this project i used
hobbilicious mdf leaves
thompson craft supplies mixed flower collections
finnabair mettalic wax firebird

and from my stash i used some small wooden letters,an A5 clipboard.

firstly icut my rice paper to fit under and round the top clip and then using 3d gel i glued it on by painting the gel onto the board then painting over the rice paper when in place.

i then used a piece of the paper pad and cut out a piece to fit at the bottom as a pocket, i cut it to shape but fussy cut along the top of the pocket and attacked it by using a strong double sided tape.

i cut out two pieces from the papers to use as mymenu sheets and added the title which i had coloured with the wax. you could use it for whatever you want it doesnt have to be a menu board , it could be a letter holder.

i distressed round the edge of the main board and then waxed all around.
i cleared gesso'd the top clip and waxed that too.

i lightly waxed my mdf leaves and then did an arrangement with them and my mixed flowers


Saturday, 15 August 2020

Mixed Media Box - Letter Box.

Mixed Media Box

My first project from my August DT kit from Thompson craft supplies.

i just love boxes and tins, i really enjoyed creating this one.


for this project i used......
Pentart crackle paste and primer
Pentart wax paste Turtle Green 
13arts color glow emerald
Dina wakley acrylic paint Blushing and Elephant
Hobbilicious box

and from my stash i used, clear gesso, half pearl beads and some ribbons, a flower from a previous kit


firstly i sponged the inside and outside of my box with the blushing and the elephant paints

i then did lots of fussy cutting from my papers and added a couple of the roses to the side of my main box.

 then i added the crackle paste just overlapping my roses, for this paste you have to add the primer first to the area you want and then add the paste, you can activate this crackle with a heat gun which is great no waiting for crackle lol

i crackles the top two parts of my lid, being careful not to cover the slits in the top most part of the lid.

i then threaded my ribbons through the slits on the lid and tied a knot and secured it to the other part of the lid and then layered the fussy cut pieces  (which i had painted with the clear gesso and dried ) onto my lid around the ribbon and added more onto the sides of my main box .

when all my layering had been done i went over it all with the clear gesso again, it adds some strength to the card elements on the box and also allows any paints or inks i add to move and sit on the top rather than going straight into the card.

i then added some ore colour with the color glow emerald and water to activate it, i dried it and then went again splattering with the emerald.

added some wax here and there

lastly i added the pearls and the flower on my lid.


Tuesday, 3 March 2020

Tell your Story-Mixed Media Canvas

Tell Your Story -Mixed Media Canvas

a small canvas using some beautiful papers and products from my latest DT kit from Louise at Thompsons craft supplies


love playing with products and just seeing where it ends up, for this canvas i was fussy cutting and layering, i love doing this. 

 these are the products used....
tell your story mdf. Hobbilicious 

i also used cheesecloth, heavy body paste, mixed media ink spray,and finnabair rose gold paste


 Firstly i covered my canvas with one of the papers from the paperpack, i distressed the edges with my craft knife.
i stenciled using some paste and the flowerstencil from AB studio.
i then went over with clear gesso so that i could used my mixed media inks.


i painted my title with the fabrics decoru paint and then sprayed with some more ink spray.
the paint gives a great texture


i added some cheesecloth, leaving it white, and then layered up my fussy cut flowers.

i then went over with some rose gold wax to pick up some more of the texture from the paste and paint.
lastly i splattered with some of the pink paint that i watered down.
i love the splattering it really just finish it off and add some more texture.